CI/CD Pipeline for Docker Applications on 3-Tier Infrastructure with GitHub Actions and ECS
- Varun Rajput
- Apr 23, 2024
- 6 min read

Updated: May 28, 2024
If you have read my blog post on automating the deployment of a 3-tier application infrastructure, then you have probably already gone through the infrastructure deployment process and might have even tried it out yourself! 🚀 However, if you are here to learn more about CICD and have already set up your infrastructure with ECS services for frontend and backend application, then you are in the right place. Let's explore further!
Target Audience 🎯
If you've got your frontend and backend Docker images all set and are eager to deploy them on ECS services, then you've come to the perfect spot!
🌟 Unlocking the Power of CI/CD with GitHub Actions and ECS🌟
Before we dive into the implementation details, let's take a moment to understand the importance of CI/CD and how GitHub Actions workflows play a crucial role in this transformative process.
What is CI/CD
CI/CD, or Continuous Integration and Continuous Deployment, is like having a well-oiled machine for your development pipeline. It's a set of practices and tools that automate the process of integrating code changes, running tests, and deploying applications. 🤖
Basic Stages of CI/CD
Code Development: Developers collaborate 🤝 on branches in Git 🌳.
Continuous Integration (CI): Code changes trigger 🚀 automated builds, tests, and integration 🧪.
Checkout: Developers' code changes are fetched and merged 🔄 into the CI pipeline.
Unit Testing: Automated tests 🧪 validate individual components to maintain code integrity.
Code Analysis: Static code analysis tools 🕵️♂️ inspect code for potential bugs and style violations.
Integration Testing: Components are assembled 🛠️ and tested together to ensure seamless operation.
Continuous Deployment (CD): Successfully tested code 🛠️ is swiftly deployed to staging or production 🚀.
Artifact Generation: Code is packaged 📦 into deployable artifacts for streamlined distribution.
Environment Provisioning: Infrastructure 🏗️ is provisioned automatically to mirror production environments.
Configuration Management: Services are configured 🛠️ to match specific deployment environments.
Blue/Green Deployment: New code versions are deployed alongside existing ones 🚦 for zero-downtime updates.
Monitoring and Feedback: Live application 📊 monitoring ensures rapid issue detection and user-driven improvements 🚑.
How GithubActions workflow is helping in CI/CD
No Additional Infrastructure Required: With GitHub Actions, you won't need to set up additional infrastructure for running CI/CD pipelines. Everything is integrated seamlessly into your GitHub repository, saving you time and resources. 🤖
Cost Savings: By eliminating the need for additional infrastructure and leveraging GitHub's built-in automation features, you'll save costs associated with setting up and maintaining separate CI/CD systems. 💰
Our Tech Stack 💻
For this deployment, we'll rely on a stack of services:
GithubActions
Terraform
Setting Up Prerequisites 🛠️
Before diving into the deployment, let's make sure we've set up a few things:
AWS Access Keys and Secret Access Key ID as GitHub Actions Secret: For secure interaction with AWS services, we need to set up AWS access keys and secret access key ID as GitHub Actions secrets.
Generate an AWS access key and secret access key ID from the AWS Management Console, ref: https://docs.aws.amazon.com/cli/latest/userguide/cli-authentication-user.html
Navigate to your GitHub repository's settings and locate the "Secrets" section.
Add two secrets: AWS_ACCESS_KEY_ID and AWS_SECRET_ACCESS_KEY, and paste the corresponding values of your AWS access key and secret access key ID respectively.
Configure AWS_REGION as well, based on your requirements, where you deployed your infrastructure.

🛠️ Let's Dive In!
If you're looking to get your hands dirty without getting bogged down in the details, you're in luck! Here's a simple breakdown of the steps the GithubActions workflow be taking
Checkout Code
Configure Prerequisites
Login to ECR
Build Docker Images
Push to ECR
Update ECS Task Definition
Update ECS Service
With these simple steps, we'll have our Dockerized application up and running on Amazon ECS in no time! Let's get started! 🚀
🤔 Wondering How to Trigger the GitHub Actions Workflow? It's Easy!
🔧 Make Changes and Push: Make your changes in the develop branch, git push it, and watch the CI/CD being triggered for your staging environment. Similarly, modifications in the main branch will deploy to your production environment.
🔍 Behind the Scenes: So, what's happening behind the screen? Let's take a peek!
Take note below pipeline is configured to for demo purposes, and is integrated with the pipeline as discussed in blog post.
Pipeline: https://github.com/var1914/automated-3-tier-infrastructure/blob/main/.github/workflows/ci_cd.yml
🛠️ Customization Tips: You can customize this as per your needs. It's considered best practice to configure workflows/pipelines from the application repository, not from the infrastructure codebase (as I've done here for demo purposes).
👀 Workflow Triggers and Environment Variables: The snap below reveals the workflow triggers and the setting of environment variables. Currently, it's configured to be triggered if the "Terraform Plan and Apply" workflow is completed, as I've explained in a separate blog post.
on:
  workflow_run:
    workflows: ["Terraform Plan and Apply"]
    types:
      - completed
If you notice the below block, there is an if condition, which tells us, that if the "Terraform Plan and Apply" workflow is a success, then only proceed with the build job
jobs:
  build:
    runs-on: ubuntu-latest
    if: ${{ github.event.workflow_run.conclusion == 'success' }}
In the same we have a block, if the "Terraform Plan and Apply" workflow fails, than echo the message
  on-failure:
    runs-on: ubuntu-latest
    if: ${{ github.event.workflow_run.conclusion == 'failure' }}
    steps:
      - run: echo 'The triggering workflow failed'
💡 Setting Environment Variables: Another thing you'll notice is the setting of environment variables for build and jobs, which is quite straightforward. If it's the develop branch, all environments like the ECS cluster name, ECS service name, and ECR repo name will be configured for staging. Conversely, if it's for the main branch, everything will be set up for production. Feel free to tailor it down as per your specific requirements!
For CI:

For CD:

You might have a question
why we are setting up envs separately into CI and CD builds rather single env: block at the top in Github Actions workflow, the reason, is we can't have the If condition in env: block
🚀 Let's Dive into the Exciting World of CI!
Now, let's talk about the exciting CI part of our workflow! If you take a closer look at the build job, you'll see how we kick things off by doing some essential tasks:
🔍 Checking Out the Code: We start by checking out the latest code from our repository, getting ready to work our magic.
- name: Checkout code
  uses: actions/checkout@v4
📦 Installing Dependencies: Next up, we make sure all the necessary dependencies are installed, setting the stage for a smooth build process.
- name: Setup Node
  uses: actions/setup-node@v2
  with:
    node-version: '14'
🔑 Configuring Credentials: Ah, credentials – the keys to the kingdom! We configure them so that our workflow can access all the resources it needs without a glitch.
- name: Configure AWS credentials
  id: aws_credentials
  uses: aws-actions/configure-aws-credentials@v4
  with:
    aws-access-key-id: ${{ secrets.AWS_ACCESS_KEY_ID }}
    aws-secret-access-key: ${{ secrets.AWS_SECRET_ACCESS_KEY }}
    aws-region: ${{ secrets.AWS_REGION }}
🛠️ Building and Pushing Docker Images: Here's where the real fun begins! We log in to our ECR repository using the configured credentials, build our Docker images, and push them to ECR. 🐳 both for frontend and backend.
Take a note of IMAGE_TAG, we are tagging docker images based on commit id.

💡 Real-world Example: For demo purposes, we're using a sample Docker image here. But in a real-world scenario, you'd replace this with your actual application's Docker image, that too in two separate repositories, one for frontend and another for backend. I have kept a working directory, where I have docker files
🔄 Passing Variables with GITHUB_OUTPUT: Ever wondered why we're using GITHUB_OUTPUT? It's all about passing variables from one step to another. This way, we can smoothly transfer data and settings between different parts of our workflow, ensuring everything runs seamlessly. 🔄
So, as you can see, each step plays a crucial role in our CI process, bringing us one step closer to deployment nirvana! 💫
Now, 🚀 Let's Break Down Our Deployment Workflow!
Let's take a closer look at each step and why it's crucial:
First, 📦 Installing Dependencies and 🔑 Configuring Credentials just like we did in CI part

Why do we need to log into ECR again, the reason ECS Task Definition needs ECR repo URL
We can pass the ECR repo URL from the build job to the deploy job, but due to some GitHub Actions issues, we need to log into ECR again, to get the URL
📥 Download Task Definition: In this step, we fetch the latest task definition for both our frontend and backend services from Amazon ECS. This ensures we're working with the most up-to-date configuration.

🔄 Update Task Definition: Here's where the magic happens! Using the fetched task definition for our frontend and backend service, we update the image ID to point to the latest Docker image built into our workflow. This keeps our frontend and backend service running the latest version of our application.
Notice how the image: parameter is taking the repo URL with the help ECR login step
ECR_REGISTRY: ${{ steps.login-ecr.outputs.registry }}
🚀 Deploy Task Definition: Now it's time to deploy our updated frontend and backend task definition to Amazon ECS. We specify the service and cluster where the frontend and backend should be deployed, and we wait for the service to stabilize before moving on.
wait-for-service-stability: true make sure that the build is successful once ECS service is updated and stable
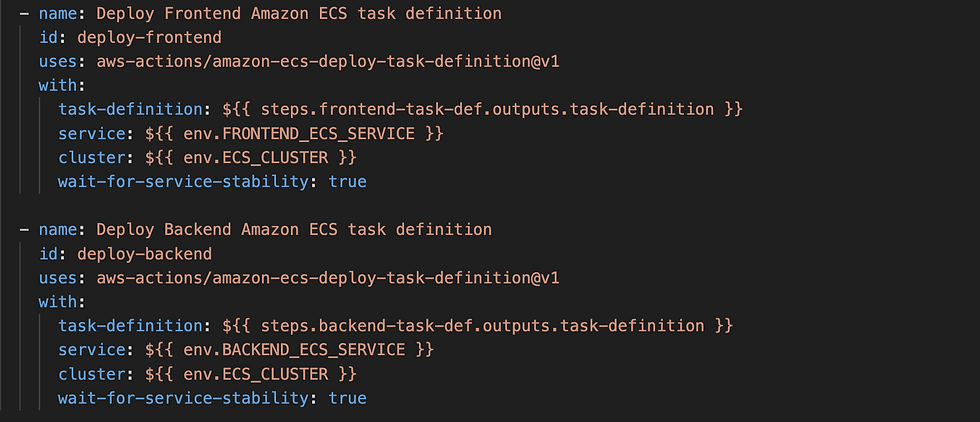
Make sure environment variables like ECS Repo, ECS service, and Cluster Name are correct
And there you have it – a seamless deployment process powered by GitHub Actions! With each step carefully orchestrated, we can ensure that our application is always up-to-date and running smoothly. 🎉
Stay tuned for more practical guides and hands-on tutorials. Until next time, happy Terraforming!
Please share and comment, to make Cloud and DevOps community better.


Comments